
First login guide
Organisation settings
Required before normal login flow
Organisation Settings is Admin only
Everything on this page is reached through Organisation Settings, which only an Admin can open. An Agent or Viewer who follows a link here is sent straight back to the dashboard with the message “You must be an admin to access organisation settings” — that is the permission working, not a fault. If you need something on this page changed, ask an Admin in your organisation.
Two settings reached from the same organisation menu are wider: Custom Fields is open to Admins and Agents, and Automations can be managed by Admins and Agents too.
New user checklist
- 1 Fill in Address line 1 and Postcode.
- 2 Add VAT, company, and website details if you use them.
- 3 Review numbering before creating your first quote or invoice.
- 4 Add terms of sale, invoice notes, and the invoice query email.
- 5 Confirm lead statuses, lead sources, case categories, sales inbox, and customer care inbox setup.
- 6 Save the settings and continue into the CRM.
Why this is the first page you see
New organisation founders are directed to Organisation Settings after sign-up. Until the required organisation details are complete, BeagleCRM treats the organisation as still being set up and brings you back to this page each time you log in.
This is expected behaviour. Complete the required address details, save the page, and future logins will take you into the normal CRM experience.
- Address line 1 for your organisation.
- Postcode for your organisation.
- The Profile page also refuses to save without an organisation name, a URL slug and an invoice query email. These are normally filled in for you when the workspace is created, so you only need to check them.
VAT details, numbering, logo, terms, payment details, and email inbox settings can be completed at the same time so documents and customer emails are ready from day one. Once you add a VAT number, VAT will be added automatically to your invoices and quotes. If your organisation de-registers for VAT, remove the VAT number; quotations and invoices you have already raised keep the VAT they were raised with, and new ones will be VAT free. Removing the number also resets the VAT rate on every one of your products to 0%.
What to check on the page
Organisation Settings is the control room for the workspace. It decides how your company appears on PDFs and emails, how document numbers are generated, how VAT and invoice defaults behave, and how sales and support intake are routed.
Settings opens on a card grid, not one long form. Pick a card to open that area, then use the back link to return to the grid. The cards are grouped as:
- Organisation — Profile, Onboarding, Custom fields, Tags, Duplicates.
- Sales & billing config — Numbering, Invoicing, Customer portal, Email templates, Leads, Online payments, Billing.
- Comms — Inboxes, Cases, Service targets, AI summaries, Integrations, Automations, Webhooks, a second Integrations card, and Calendar feed.
- Data & admin — Data & export, including permanently deleting the organisation, and Trash.
Two cards under Comms are both titled Integrations, so check which one you are on. The first sits directly under AI summaries and opens a panel inside Settings for connecting Mailchimp — its card reads “Connect Mailchimp to send marketing email from your own account”. The second sits below Webhooks, opens its own page, and lists the apps connected to your data, such as Zapier, so you can disconnect them. Only the first has anything to do with Mailchimp.
Several cards jump to their own pages rather than a panel inside Settings: Onboarding, Custom fields, Tags, Duplicates, Online payments, Billing, Service targets, Automations, Webhooks, the connected-apps Integrations card, Calendar feed and Trash. Of those, Onboarding, Custom fields, Billing and Automations each have a full section of their own further down this guide; Tags and Duplicates are covered in the Customers section.
Business profile and support ID
Confirm the organisation name, URL slug, Address line 1, Postcode, city, county, website, Companies House number, and VAT number. The Support ID is the organisation UUID support may ask for when investigating a workspace issue.
Logo and document branding
Upload a PNG or JPG logo up to 5MB. The logo is used on quotation PDFs and other customer-facing documents, so check this before sending your first quote or invoice.
VAT and business identity
VAT details, numbering, logo, terms, payment details, and email inbox settings can be completed at the same time. Once you add a VAT number, VAT will be added automatically to your invoices and quotes. If your organisation de-registers for VAT, remove the VAT number; quotations and invoices you have already raised keep the VAT they were raised with, and new ones will be VAT free. Removing the number also resets the VAT rate on every one of your products to 0%, and adding one back sets them all to the standard rate. The standard VAT rate becomes the default for new products and line items.
Document numbering
Quote, sales order, invoice, and credit note prefixes and next numbers are configured here, alongside purchase order and project reference numbering. The table previews the next number for each series, so review these before live documents are created.
The same section carries Supplier bill terms, with a single field — Due (days after bill date). New supplier bills, including the one recorded when a purchase order is received, fall due that many days after the bill date. It defaults to 30, accepts 0 to 365, and you can still override the due date on an individual bill.
Invoice and payment setup
Set automatic invoice reminders, the reminder stop count, default payment terms, payment terms text, and the invoice query email. The query email appears on invoice PDFs, invoice emails, and payment reminders.
Terms and customer-facing notes
Terms of sale are printed on quotation, sales order and invoice PDFs. Invoice notes are printed on invoice PDFs only, which makes them the right place for bank details, payment instructions, or invoice-specific wording.
Sales process setup
Sales process setup is spread across four separate cards, not one panel. Invoicing holds the terms of sale printed on quotation, sales order and invoice PDFs; Leads holds lead statuses, lead sources and next-action types; Cases holds service-desk case categories; and Inboxes holds sales and customer-care inbox routing. Between them these decide how users create leads, how the pipeline is valued, where sales emails are linked, and how support emails become Service Desk cases.
Lead statuses
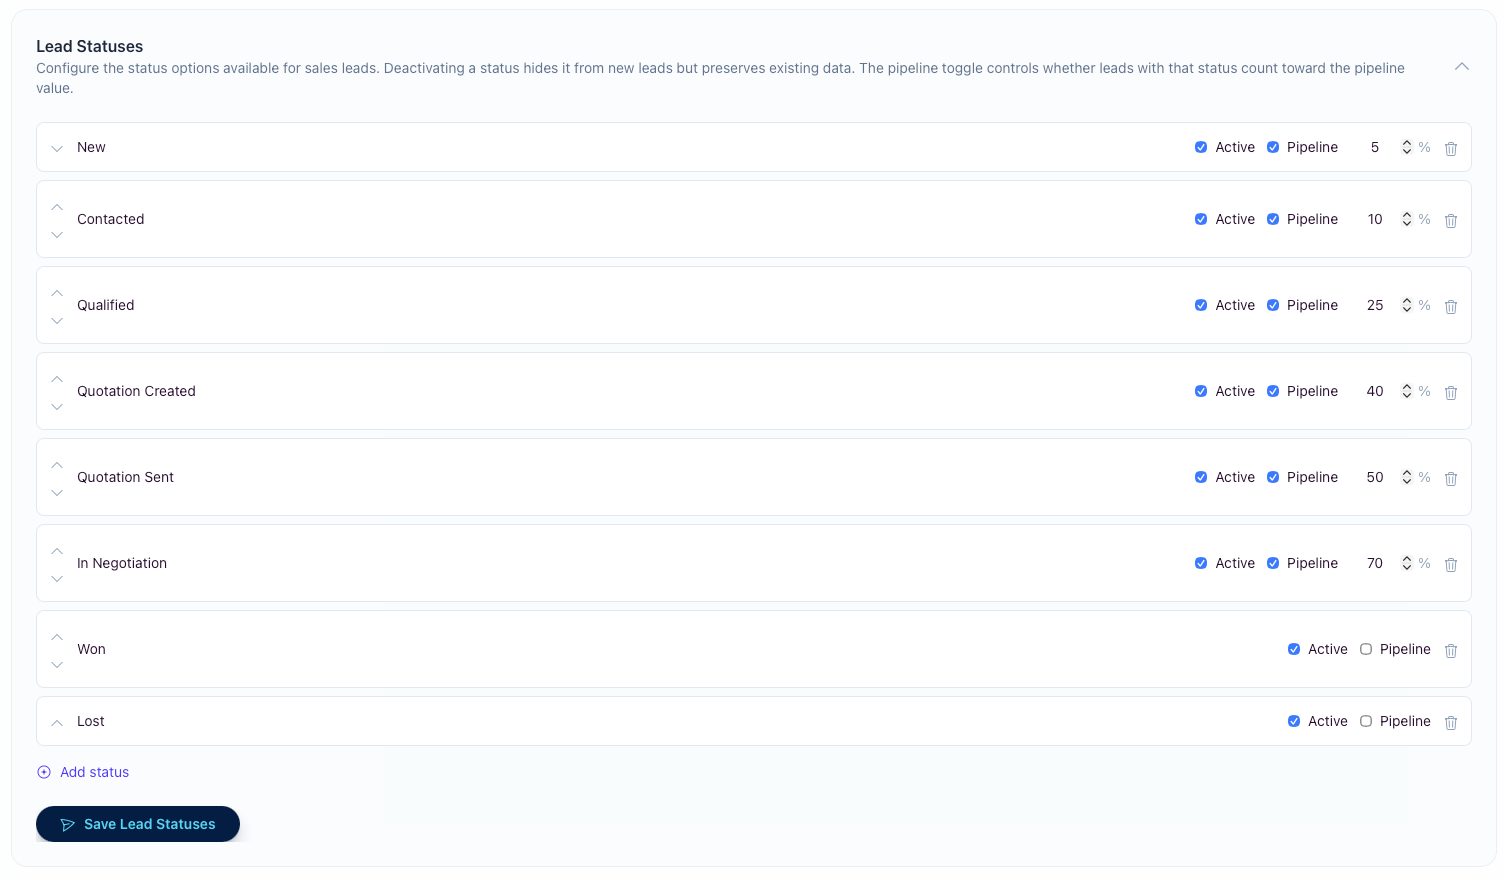
Lead statuses define the stages in your sales process. The default setup is New, Contacted, Qualified, Quotation Created, Quotation Sent, In Negotiation, Won, and Lost. You can rename stages, reorder them, add new stages, deactivate old stages, and save the list independently from the rest of organisation settings.
Active vs inactive
Inactive statuses are hidden from new lead choices but existing leads keep their stored status. Use inactive when retiring a stage without rewriting historical lead data.
Pipeline and probability
The Pipeline toggle controls whether leads in that stage count toward pipeline value. Pipeline stages also carry a forecast probability, such as 5% for New, 40% for Quotation Created, or 70% for In Negotiation.
Removing statuses
A status already used by existing leads cannot be removed. The trash button is disabled for those rows, and the app also checks the same rule when you save. This protects historical pipeline and reporting data.
Lead sources
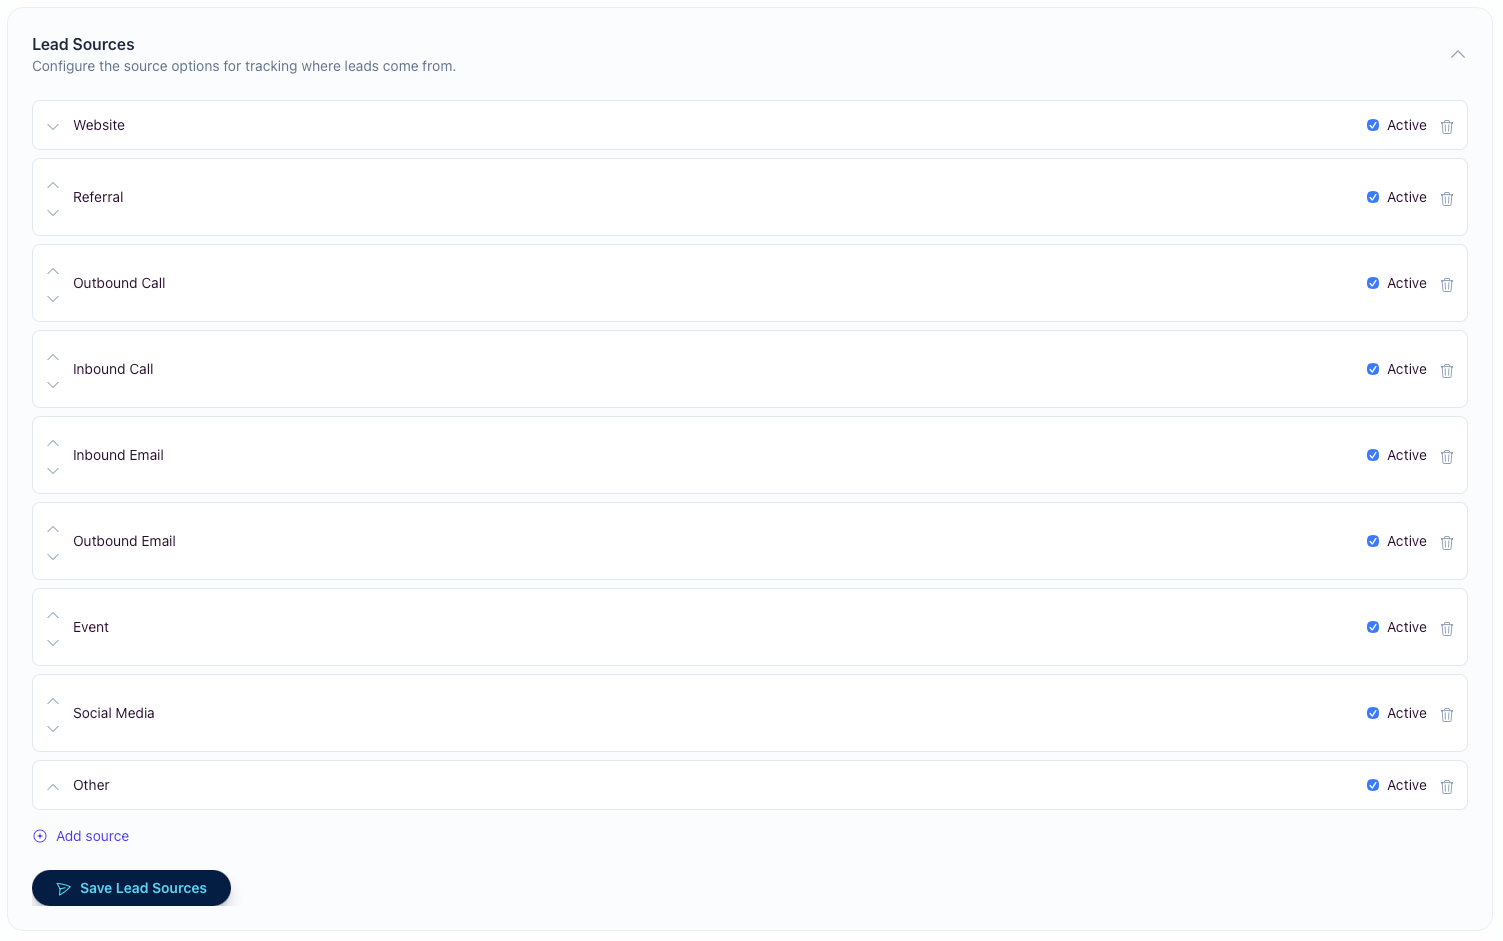
Lead sources track where opportunities come from. The default list is Website, Referral, Outbound Call, Inbound Call, Inbound Email, Outbound Email, Event, Social Media, and Other. Keep this list broad enough for consistent reporting and use campaign data for short-lived marketing details.
Editing the list
Rename sources, reorder them with the arrow controls, add new options, and use the Active checkbox to hide sources from new lead forms without losing old data.
Removing sources
Sources already used by existing leads cannot be removed. Deactivate the source instead when you want users to stop choosing it for new leads.
Next-action types
The Leads card also configures the next-action types offered when you set a lead's next step. The default list is Call, Email, Site Visit, Quotation Review, Proposal Revision, Pricing Discussion, Decision Meeting, Follow-up After Quote, Internal Pricing Review, and Other. Rename, reorder, add and deactivate them the same way as statuses and sources.
System action types
Follow-up After Quote is marked System and cannot be removed — automations create it when a quotation follow-up is due. You can still rename it or switch it inactive.
Types already in use
A type used by existing leads is flagged In use and its delete button is disabled. Deactivate it instead to keep it off new lead forms without touching historical data.
Case categories
Case categories group your Service Desk cases. The default list is General Query, Complaint, Billing Query, Delivery Issue, Product Issue, Order Change, Return or Refund, Appointment Change, Account Query, and Feedback — rename these or add your own to match how your team triages support.
Editing the list
Rename categories, reorder them with the arrow controls, add new options, and use the Active checkbox to hide a category from the New Case form without losing the cases already filed under it.
Choosing the default
Mark one active category as the Default with the radio button. It is pre-selected on the New Case form and applied automatically to cases raised from the customer care inbox. Exactly one active category must be the default.
Removing categories
Categories already used by existing cases cannot be removed. Deactivate the category instead when you want users to stop choosing it for new cases — older cases keep their label and stay filterable.
Sales and customer care inboxes
Sales inbox
Connect Microsoft 365, Google, or IMAP for the sales inbox. Emails received here are auto-linked to customers and create follow-up tasks, helping the team keep sales conversations connected to CRM records. Google needs a one-off setup first — see Google email setup .
Customer care inbox
Connect Microsoft 365, Google, or IMAP for the support inbox. Emails received here create support cases in the Service Desk, preserving the original message as the starting point for the case workflow. Google needs the same one-off client setup as the sales inbox.
AI customer summaries (bring your own Claude or ChatGPT/OpenAI key)
What it does and how to turn it on
On a customer's page you can generate an AI summary — a short brief that digests that customer's notes, activity events and linked emails into the current relationship state, last meaningful contact, sentiment, and any open risks or next steps.
The feature is off until an admin turns on two separate switches in the AI summaries card in Organisation Settings. First, connect a provider: choose Anthropic Claude or ChatGPT/OpenAI and paste your organisation's own API key. Second, under Sending records for enrichment, press Enable enrichment — holding a key is not the same as agreeing to use it, so this consent is off by default and can be turned off again at any time. Until a key is saved there is no AI summary panel on the customer page at all; with a key saved but enrichment still off, the panel appears and Generate returns a "Connect an AI provider in Settings first." message. Nothing is sent anywhere until both are in place.
For ChatGPT/OpenAI, this means an OpenAI API Platform key from your OpenAI organisation or project. A normal ChatGPT web login or ChatGPT Plus/Business subscription cannot be connected directly here; OpenAI API billing and ChatGPT subscriptions are managed separately by OpenAI.
Once both switches are on, open a customer and click Generate (Regenerate to refresh it). The result is cached and shows when it was generated and how many notes and emails it was based on. Agents and admins can generate summaries; the API key itself can only be added or removed by admins. The key is stored encrypted and is never shown again once saved.
Why isn't AI just included in my subscription?
Some platforms bundle AI into the plan. We deliberately don't — and we think our approach is better for a UK business that cares where its customer data goes.
With bundled AI, the vendor chooses the AI provider, the data path and the terms, and routes your customers' data through their own AI account. With Beagle, you connect your own Anthropic Claude or OpenAI key, so:
- Your data goes only to a provider you control — no shared, Beagle-owned AI account sits in the middle.
- You stay the data controller and pick the provider, plan and region that suit you, and you can agree your own terms directly with them.
- You pay your provider directly, at cost — Beagle adds no markup and takes no cut.
- You're not locked in — choose Claude or OpenAI, switch anytime.
- It's genuinely opt-in — nothing is sent anywhere until you switch it on.
It's the same class of AI the big platforms bundle, but on your terms, not ours. The only trade-off is a one-time setup step: an admin creates an account with your chosen provider and pastes a single API key.
Why we use your own key (bring-your-own)
Cost stays yours, with no markup. AI summaries run on your organisation's own Anthropic Claude or OpenAI API account and are billed directly to you by that provider. Beagle adds no per-summary fee and takes no cut — you only ever pay your AI provider for what you use.
Your data, your control. Customer information is only ever sent to the provider under your account, which you control. You remain the data controller for what leaves Beagle and can set your own retention and usage terms directly with that provider — important for GDPR. We never route your customers' data through a shared, Beagle-owned AI account.
Strictly opt-in. Because the feature does nothing until you add a key, no customer data is sent for AI processing unless you have deliberately switched it on. Remove the key at any time and the feature turns off again.
What gets sent, and data minimisation
When you generate a summary, what is sent to your chosen provider is that customer's notes, activity events and linked emails, plus up to eight short excerpts from that same customer's other records, picked as the most relevant to the brief. Those excerpts can come from their cases, quotations, sales orders, invoices, leads, projects, project documents, tasks, contacts, purchase orders and the text extracted from their attachments.
Nothing about your other customers is included — the search that picks those excerpts is restricted to the one customer you are summarising, and it honours the same section permissions as the rest of the app, so a member cannot see content through a summary that they could not open directly. AI processing happens one customer at a time, only when you ask for it.
Good to know
- What's sent: the selected customer's notes, activity events and linked emails, plus up to eight short excerpts from that same customer's other records (cases, quotations, orders, invoices, leads, projects, tasks and attachments) — and nothing about any other customer.
- Where it's processed: this depends on the provider and plan you choose. Standard Anthropic and OpenAI API calls may be processed outside the UK, for example in the US. If data residency matters to you, such as UK/EU-only processing, check your provider's region options and terms, as you are responsible for any international transfer safeguards.
- Training: whether your data is used to train AI models is governed by your own agreement with Anthropic or OpenAI. API usage on standard business terms is generally not used for model training, but you should confirm this in your provider's data-usage terms.
- Accuracy and decisions: summaries — including sentiment and any "open risks" — are AI-generated and may be incomplete or wrong. Treat them as a starting point to help you, not as the sole basis for a decision about a customer.
- The summary itself: the generated summary is cached inside Beagle under your own account and shown with its generation date and the number of notes and emails it was based on. Regenerating overwrites the previous version. Removing your key turns the feature off.
- Security: your API key is stored encrypted, is never shown again once saved, and is only used to send summary requests to the provider you selected. The personal data contained in summary requests is not written to our application logs.
Connected assistants (AI assistants via MCP)
What it is and who can reach it
Separately from AI summaries, a team member can connect an outside AI assistant to this organisation so it can answer questions about your data on their behalf. Open the organisation menu in the top-right and choose Connected assistants. The menu item and the page are Admin only; an Agent or Viewer who reaches it is returned to the dashboard.
There are two gates. Beagle must first approve your organisation for the feature — until it does, the page reads “Assistant access isn't enabled for this organisation yet” and there is nothing to switch on. Once approved, an admin turns on Assistant access here. Each individual connection then still needs an admin's explicit consent.
What connecting an assistant grants
A connected assistant gets read-only access to a set of business questions about this organisation: who the connected member is, what needs attention, the sales pipeline, recent activity, aged debt, and top customers and products. It cannot create, edit or delete anything in Beagle.
Access is always on a team member's behalf and never wider than that person's own: it stays inside this organisation and respects the sections their membership allows, so an assistant cannot read something its owner could not open themselves.
Reviewing and disconnecting
The page lists every connected assistant with when it was last used and how many sessions are active, so an admin can see what has access. Disconnect revokes that assistant immediately and destroys its stored access for this organisation, so it cannot quietly renew itself; the assistant would have to be connected again from scratch. Turning Assistant access off again switches the whole feature off for the organisation.
